Patterns and Tutorials

29 August 2014

Mille Colori Beanie

Hello! Today, I would like to share with you a little bit of a surprise project that literally fell off my hook a couple of days ago. It started life as a bag-to-be, after I purchased a stash of gorgeous Mille Colori yarn by Lang.

What I first made were these two simple treble (US dc) circles:


In my mind, I had a very clear vision of what I wanted them to become. A circular bag, either like this one or this one. But months went by and the two circles lay forgotten in my WIP basket until I unearthed them recently. 

Lately, I have been working on bags quite a bit, such as this one, and a couple of others, which haven't yet made it to my blog in their finished forms. And as I looked at the two circles, I thought I had had enough of bags for now. I suddenly remembered that one day, when I was still making the circles, someone had asked me if I was making a hat. And then, it became crystal clear to me: this yarn wanted to become a hat.

So I frogged the circle on the right hand side in the above pic, after much deliberation over which circle would be the continuation of the other, and with the fresh ball of yarn thus obtained, I carried on working from the first circle.

About two hours later, after quite a few try-ons over yours truly's head, I had a fully finished hat. Would you like to have a look? I hope you do, because I have pics of it under about every possible angle ;) Ready?


I love how the variegated yarn created this neat contrasting border effect. If that isn't serendipity, I don't know what is.


Aaah, and just look at these amazing colours creating random stripes. That's what I love about variegated yarn. You never quite know where it's taking your project. I find it quite liberating that I don't have to think abour what colour could be next. I suppose it is a little lazy, but let's say it's lazy in a good way :D


To join the rounds, I didn't count the first 3 chains as one treble as one usually does when working in rounds. That way, I avoided the telltale spiralling seam that is so characteristic of crochet worked in the round and which I am really not a big fan of. 

Go on, have another angle.


And the last one, I promise!


So, as you probably can tell, I am very pleased with this little unexpected project. It really feels as if it was waiting to jump off my hook at the best opportunity, and whether I wanted it or not! I love this. It's one of the joys of the creative process. So what do you think?

The hat is extremely simple to make, so if you want to have a go, I'll write a pattern as soon as I have some time.

Till then, ta-ra!

27 August 2014

Weekly Granny Fix

Yes, it's that time of the week again. Time for granny squares! Well, you might remember from last week that I had reached the ultimate 182 figure. After a recount, it seemed that I did have the correct number as well. So all I needed to do next was to weave in the remaining ends...


... and start the joining, which meant laying out all squares first to decide which went where. That was a lot trickier than I thought it would be, actually. No squares are the same, but a lot do look similar, and you really don't want to see them side by side in the finished product. So it was very much like completing a puzzle.


And when I was finally happy with the layout...


... I labeled each row for future reference, and at long last, started to join up the squares, with a row of dc (US sc). So far, three vertical rows have been joined:


We'll see how long the rest will take me. Watch this space! And as always, go have a gander at Jijihook's website to see what the others have made this week.

See you soon! :)


23 August 2014

Cute Little Surprise Bag

Recently, it was a friend's birthday and I started pondering what I could get her. Lately, I have been steering away from shop-bought presents in favour of handmade stuff, and so naturally I thought about making her something. Since I didn't have that much time (I am not the most organised person in the world), I needed something reasonably quick to hook up.

That's when I thought of crochet earrings. I'd made myself a pair last year, following this really good tutorial:


And so, I made another pair in a different colour:


Pretty, aren't they? I must have used a smaller hook this time, since I managed to make three rows rather than two inside the hoops. For the life of me, I can't remember which hook size I used for the ones I made for myself (told you I'm not very organised!).

Then, I wondered how I would wrap them up, and I thought, rather than use paper wrap that would go straight to the bin, why not crochet a gift wrap as well? That way, it would be reusable as well as (hopefully) pretty. So I decided to make a little 'surprise' bag.

My inspiration for it was the bag of scrubbies I hooked up a couple of months ago for another friend of mine - and for which I intend have to write a tutorial to post on here, I promise. This new little bag, however, would be flat rather than have a round bottom. But it would definitely have the ruffled top and a row of spaced stitches to thread a pretty ribbon into.

For this project, I used a yarn from the Sirdar Snuggly Siley Stripes range, less for its lovely softness than for the fact that it had been sitting unused in my stash for over a year ;) Just for reference, I think this particular colour has been discontinued, unfortunately.


And off I went. With a 3.5mm  hook, I made a foundation chain of 16 (er, I think... but you can make it as long as you want to fit your own project), then 14 dc (US sc) into it, and then worked in rounds of dc (US sc) until I reached the desired height. I then worked a round of treble (US dc), ch1 in every other stitch from the previous round, and finished off with three rounds of ruffles: one round of 2 dc in the ch1-space from the round before, then two rounds of 2dc in each dc from the previous round (this is what creates the ruffling).


Finally, I threaded about 80-90 cm of ribbon into the row of alternating trebles and tied it into a bow after slipping the earrings inside the bag. And ta-dah!


So what do you think? Would you make something like that for a friend - or for yourself, for that matter? I plan to make another one for myself and I'll probably take the opportunity to make a photo tutorial to put on this blog. How does that sound?

Thanks for reading, folks! :)


20 August 2014

Wednesday Grannies - A Milestone!

Hello, hello! Well, that's it. I have officially reached the 182 figure (that's it, until I've done a recount!). I have 182 fully squared up pieces for my Blanket. I can't quite believe it.

Shall we have a look at the very last batch I hooked up? Here goes...


All there is to do now is to weave in the ends of these babies (roughly 20)...


...then check for any exact colour repeats, which I'd ideally like to avoid, and then start the joining. I have decided to go for a relief join in DCs (US SCs), just to give Blanket some texture. And when I have joined the 14x13 rows, it'll be time to make a border. And no, I haven't even thought of that yet! I'll cross that bridge when I get to it :) Right now, I can't wait to start the joining. I have been looking forward to that moment for the past seven months! Most likely, I will have some pictures of that to show you next week, at least I hope so. Ah, exciting times!

Anyway, in other granny square news, I have tried my hand at classic "baby" granny squares and the join-as-you-go technique for that secret/undefined project I mentioned a while ago. This is all in the testing phase, and more to play with hook and colours than anything, really.


Thanks for reading, and go have a look at Jijihook's to see what the others have hooked this week.

Ta-ra!
18 August 2014

From WIP to FO: Granny Square Messenger Bag

Yipee! I have a FO (Finished Object) to show you guys, one that was a WIP (Work In Progress) for months on end.

It started off with a gorgeous bit of variegated yarn randomly bought in France. The yarn is actually German, though. It's Lang Mille Colori. Go on, feast your eyes over its dazzling beauty:


Out of this yarn came two lovely solid granny squares, to which I added a row in black yarn, to make the colours pop a little more.


From then on, I knew I was going to make a little messenger bag out of those beauties, and so I carried on with the black yarn to make two rectangles, one of them slightly bigger to form a flap (sorry, I only have a picture of the front rectangle for you).


I then joined them together with a row of double crochet stitches (US single), and then embellished the edges with a row of crabstitching in the same variegated yarn as the squares. There's a funny story to this one, actually. After the two squares, I'd run out of yarn, and because you can't find it in the UK (at least, as far as I know), I asked a friend of mine who was off to Germany to bring me back some. She ended up calling me from the yarn store in Munich to confirm the sale! But anyway, after this little adventure, this is what my WIP looked like:


It was time to add a strap, which I made in the same black yarn as for the body of the bag. I made it as a long succession of dcs, not really bothering to count and just checking the length against my own shoulder.


When that was done, I grabbed the variegated yarn again and used it to surface crochet all along the strap, as an embellishment and to balance the use of colour. I also added a purple duffle-coat fastener on the front of the bag.


It was then time to tackle the lining. From the moment I wanted to make a bag out of the two squares, I had a very clear vision of what sort of fabric I would use to line it. It would have to be a shimmering, dark green fabric to bring out some of the green in the colour squares. Luckily, I found exactly what I'd envisioned, at my local fabric store.


Then came the process I am always the least comfortable with when it comes to my crochet projects, and crochet bags especially: constructing and sewing the lining. So I took endless measurements, did countless calculations and jotted most of it down on a blank piece of paper, along with some very basic sketching.


And then, the cutting started, stopped, and had to be done again. At some point, I came to wish I hadn't picked this particular fabric, as it was so slippery and difficult to control for my inexperienced hands. But after a couple of frustrated attempts, I managed to get a result I was reasonably satisfied with, and hey presto! I had a Finished Bag!


There is a pocket in there, but it proved rather shy for the picture. On top of that, it sports a lovely burn mark form the iron after a slightly intense session of pressing! But fortunately, said mark is at the bottom section of the pocket, so that will be our little secret, won't it? ;)

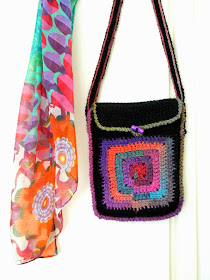
Anyway, ready for a full reveal? Here goes...


And the reverse side...


It's far from perfect, but I am very pleased with it. Even better, I feel I am getting the hang of fabric lining, and this project gave me the confidence to tackle more complex tasks, which I will hopefully be able to post about very soon.

Many thanks for reading, peeps, and let me know what you think! :)


13 August 2014

It's 'mercredi' again!

Wednesday... That means it's grannies o'clock! I was hoping to finish all squares for today, but I have been slower than usual, due to a very pesky bag lining that I am currently working on. For this bag:


Yes, I have finished the square bag that I mentioned last week, and I have set out to make a lining rigid enough to hold up the bag. That means interfacing, and pinning, and stitching, and ripping and pinning and stitching again. It is truly the most complex crafty venture I have undertaken so far. Very challenging, sometimes frustrating - there even have been a few tears - but all together very exciting.

Consequently, my poor Blanket has been a tad neglected this week. I have been able to square up the circles I showed you last week...


...and made 11 first rounds of the last ever batch of sunburst circles...


...of which 5 made it to full circle status...


That means 6 to go, after which there will be one last session of squaring up and theeeeen... well, the joining could start in theory, but it will be preceded by some serious recounting, just to make sure I actually have 182 squares. Because frankly, I can't guarantee an exact count when my granny stash looks like this these days:


Hopefully by next week, I'll have the final, completed, batch to show you. In the meantime, have a look at what the others have made this week for Jijihook's Challenge.

Thanks for reading! x

06 August 2014

Wednesday

It's Wednesday again, how time flies! Right, the end is seriously in sight for my Blanket. Well, for its squares anyway. I squared up all remaining circles from last week and made four more full squares, plus seven circles. Soooo, that's a total of 171 pieces. That means just 11 squares to go! Shall we have a peek?


On top of the usual Blanket work, I have unearthed a couple of unfinished granny square projects that have been lying around for too long.

This little messenger bag, which I have finally completed...


...and this other granny square bag, which now looks more like a bag than it has ever had! I plan on adding a braided strap in the colours of the balls of yarn pictures.


Thanks for reading, and don't forget to have a look at the other hooksters' work on Jijihook's website.

01 August 2014

Bag O' Scrubbies

It started one evening when I ran out of cotton pads to remove my make-up. Suddenly I thought how convenient and environment-friendly it would be if I had reusable cotton pads. Immediately, I thought of this tutorial, which I'd always liked the look of, and I resolved to make myself a little bunch at some point. At around the same time, I was getting ready for my holiday in France, and I started thinking about a present to bring to my friend in Paris.

And that's when it hit me: reusable pads - or scrubbies - would make a great gift. I could even embellish them a little bit, and... present them in a little bag made especially for them! From then on, I had a very clear vision of how I wanted the whole thing to look like. I feverishly picked up my crochet hook and off I went.

This was the first time I'd used the puff stitch. I really love the look of that stitch, and it's fun to make, too! The only thing is, it eats up a lot of yarn. Just nine pads were enough to finish a ball of Stylecraft Cotton Classique. 


Aren't they lovely? Their puffiness kind of makes you want to bury your face in them. Well, it does me, anyway! ;)

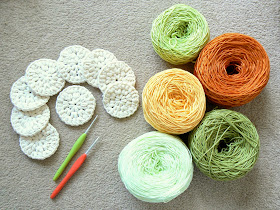
Next up, I needed to choose a colourway to adorn the scrubbies and make the bag. This is what I got from my stash:


A vibrant, sunny palette to suit my friend's zesty tastes. I then proceeded to embellish each scrubby with one row of surface crochet on the edge, just to bring a bit of pop to them.


And then, it was time to make the bag itself. Unfortunately, I did not take any pictures while I was actually making the bag, as I did most of it at night time, but here is how I proceeded: I first made a simple circle of trebles in a cream cotton yarn for the base, as a kind of echo to the shape of the pads themselves.


The body of the bag was worked in striped rows of trebles, with no increase to achieve a cylindrical shape.


Once I'd reached a sufficient height to comfortably encase all pads and close the bag onto them, I worked a row of alternating trebles and made a long chain in cream to string through.


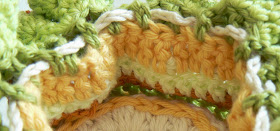
I then carried on with a few ruffled rows for a decorative opening of the bag.


And finally, I adorned each end of the cream-colored chain with a puff-stitch flower, both for decorative purposes and to keep the string from slipping through and off the neck of the bag.


And that was it! Here's the suspect in full :)


I absolutely loved making this. In fact, I loved it so much that I've recently made another little something on a similar principle. As it is to be a surprise gift, I can't say anymore more on here, but I will definitely blog about it as soon as it's presented to its future owner!

In the meantime, what do you think? Would you make a gift like this one? I am thinking of writing a tutorial that I'd post on here. How would you like that?