Patterns and Tutorials

20 February 2014

A Little Update


Hello, hello, I have had a busy week! Friends came over and I did a spot of sightseeing with them, which is always a nice distraction, especially when the weather is decent (a rarity these days!). 

Crochet-wise, it's been another multi-project kind of week. I've made a few more squares for the Blanket, not as many as I would have liked, but I think it's because I'm not liking the yellow too much for the bedroom and thinking of adding red to the equation. This will almost certainly entail an online order sometime soon. But until I am fully satisfied with the colours I am using, I think I am going to stall a little on this project. To be continued...


I did finish a project this week: the yarn basket I mentioned in this post. Once I overcame the technical issues I'd faced in the beginning, the basket worked up very quickly indeed and was done within a couple of days. Hooray for super chunky yarn! I intend to write a full post about it soon, but here's a sneak peek in the meantime:


Do you remember my first home project, otherwise known as the Rug? Well, I have tons of scrap yarn left from it...

Scrummy, isn't it? Well, I thought I'd make something out of it, and since my favourite scarf is getting a little worse for wear... a new scarf it will be! Here it is in its first stages.


It is now twice as long, but I'll wait till it is over to reveal more pictures. Well, apart from close-ups of chunky, snuggly stitches, that is:


 And finally, there has also been progress on a project that had been stuck at this stage for a while:


You may remember these two darlings from this previous post. Anyway, the idea was to make a small messenger bag out of them. The reason the project was delayed was that I misplaced the last bits of variegated yarn used for the coloured squares, and I intended to use them to make a border for the bag. A friend of mine was kind enough to get some for me while on a trip in Germany, and I was therefore able to resume work. Well, after quite a few trials and errors, I am pleased to say the body of the bag is more or less done! All is left to do now is to add a button, a strap and of course, a lining. I really like the way it's turning out, and cannot wait to hold the finished product in my hands. A sneak peek? Come on, just a little one ;)


Love, love, love the colour combinations, but then again, I loooove variegated yarns, so I may be a tad biased. I shall definitely write a post when the bag is completed.

In the meantime, I hope you enjoyed this little update. I may not be able to post next week, as I am going on holiday (somewhere cold in the far, far north), but as I intend to buy some yarn there, I will of course tell you more about it when I am back (or while I'm there, time and Internet connection permitting!).

Take care all! :)

16 February 2014

Into Tapestry Crochet


Crochet has many fascinating sides, and one of them is tapestry crochet, or intarsia. The technique, similar to fair isle, involves changing colours mid-row to form intricate patterns, and gives much more freedom than simply changing colours at the end of a row. There is literally no limit to what you can create, from simple geometric shapes, like this pop-arty cloth by Jellywares (tutorial here)...


...to mind-boggling designs, like this one by Esther Holsen...


...to actual landscapes, like this one (unknown artist):


How amazing is that? There's even a whole website dedicated to it, by Guatemalan artist and master of the technique Carol Ventura.

In my early crocheting days, I spent hours on Pinterest going through hundreds of tapestry crochet pictures, gawking at them and wishing I could make something remotely similar.

Then, I bought this crochet book, where the technique was explained and illustrated in much detail. There was also a simple pattern to try your hand at the technique:


For some reason, I loved the look of it. Simple, but effective. Understated, yet original and powerful. I actually never got round to making it, and if was only much later that I realised it had inspired me for the project this post is about.

There is a special someone I know who loves the colour blue. Roughly around then, it was time to start thinking about getting him a birthday present. Only recently, he had treated himself with a brand new tablet, so the path to take was obvious. I would crochet him a tablet cover and I would do so in blue shades and in tapestry crochet.

I had a clear image in my mind, which I quickly sketched into my trusted notepad:


The letters are French - my first language - for the various colours: BF (bleu foncé) is dark blue, BC (bleu clair) light blue and BL (blanc) white.

Next, I drew a custom table in Word and coloured the cells with the appropriate shading, which I then copied and pasted in Paint:


In the meantime, I needed to find out how many stitches and rows would be needed to make the cover, which would in turn help me know where exactly I needed to change colours. After I made a swatch (I impressed myself there, I HATE swatching!), I knew I needed 29 stitches by 58 rows. So all I needed was to superimpose a rectangle made of 29x58 tiny squares onto my custom table.

I now know that there are special softwares that can convert images into stitch graphs, such as Knitpro 2.0, but I didn't at the time, so I went the makeshift route. I enabled the grid view in Paint and adjusted the image so it fitted over 29x58 squares and saved it as an image:


And that was the theory done. The actual crocheting was next, and I have to admit I was getting a little nervous about it. I had never used that technique before and I wasn't even sure I actually understood it. So I made another swatch, this time with colour changes, until I felt a bit more confident. The resulting item didn't look like much, but the Cat loved it, and it now has the official status of Cat Toy, hence its dreadful appearance and the reason why it can't possibly appear in this post.

And so I started the real thing. Boy, did I struggle with the first few rows! The three different threads kept getting tangled, and every colour change was slightly nightmarish, as I simply couldn't get the tension right. And I found the running of the "unused" yarn behind the work unsettling, accustomed as I had been so far to just cutting it and forgetting about until the project was finished. Plus, you have to remember to put the threads on the same side of the work, which can be a challenge when you have to turn it over with every row. Anyway, I slowly got there after a bit of sweating (and, yes, swearing). Here's how the wrong side of the work looked, with all the unused yarn carried over:


After a few rows, however, I really got the hang of the technique, and to my delight, the rest of the front panel worked up rather quickly, and most importantly, neatly. Here's a close-up look at the right side (oh dear, with cat hair, I'm afraid...)


Working a back panel was an absolute breeze after all this, as it was in plain dark blue. In about a couple of hours, it was finished and within another hour, joined to the front panel with a round of double crochet stitches in light blue:


I have to say it was quite refreshing and therapeutic to be able to work on uninterrupted rows of one single colour after all these strictly algebric colour changes for the front!

And so I was done! Ready for the big reveal? Drum roll, please......

TA-DAAAAH!!!! (I know I'm totally stealing Lucy's way of presenting finished projects on Attic24, but let's say it's a form of homage ^_^)


It was not prefect (especially as I realised I dropped a stitch at the end of a few rows), but in spite of this I have to say I loved it. I loved the fact that I'd managed to use a new technique and completed a project with it. And I loved, loved the idea that this physical, tangible item had started life as a mere pencil scribble in my little notepad. I couldn't quite believe it!

In the few months since completing this project, I have been meaning to start another tapestry crochet project, but have never got round to it. There has been so much more to explore, colour combinations, projects for friends, home projects... But I'm sure at some point I will get an unbearable itch to try the technique again, this time with different colours and/or different shapes.

Have you tried tapestry crochet yourself? I'd love to see your projects!

13 February 2014

Nothing in particular


There's both a lot and not much happening at the moment. I've got a lot of WIPs and none of them are at a stage worth a whole post, so here's a little nothing-to-it update on how things are doing here in Little Crochet world. 

I've been working on the Blanket (complete with cat hair)...


I've been working on a tutorial for the sunburst granny square used in the Blanket...

Killing two birds with one stone (it's just a figure of speech, I wouldn't, really!) I've been taking part in a granny square challenge on Jijihook's website. You should join, too, it's good fun!

I've been trying to design a crochet basket to hold all the yarn for the Blanket, as it's beginning to dangerously invade the living room. Boy, have I sweated over the blasted thing. It started off with a red base...

...but that used up too much yarn, so I tried a different base with two different types of yarn... 

...but those were too thin, so I tried again with the same yarn as for the red base, but with a mix of white and red to save up on yarn:

I apologise for the terrible lighting here, night had fallen! Anyway, the basket is now nearly done, although I think I might still run out of yarn, aaaargh! I'll post some decent pics as soon as daylight returns, which might not be till spring, to be honest. :D

Anyway, I've also enjoyed using my camera again, as you've seen in the pictures above. I do love my iPhone camera, but there's no comparison with a proper one. The details are so much crispier, you can almost touch it. So today, whenever I took breaks from work and from crochet, I played around a little bit:


The Cat is always a favourite subject of mine, as my long-suffering Facebook friends know too well. I absolutely love the definition and the detailing of this shot. 

I also enjoyed a rare glimpse of sunshine and blue sky today, as I was vaguely yoga-ing in between work sessions:

That's a sight for sore eyes, in those dull winter months!

And I liked how the sun played on one of my indoors plants, so quickly snapped it before heading back to my desk and computer:

All in all, a feast of colours, but there's nothing new here. I love colours and I find just looking at them can restore some of my energy, so I make sure I get an abundant supply!

Will be back soon with more crochet-worthy updates! xxx

09 February 2014

The Big Project Itch


As I said in a previous post, having recently moved house changed my whole WIP dynamics. First came the Rug, my first proper home project, which is now no longer a WIP and brings such colourful notes to my bedroom. *sighs contentedly as she casts a fond look to the item in question*

I then tackled a cushion cover, with both mixed results and feelings, I admit. I set out to use a discounted colour pack once ordered online. Said colour pack had been discounted for a reason. It was the cheapest-looking acrylic yarn I had ever seen, horribly scratchy - especially the white one - and in tacky, Barbie-reminiscent shades - which obviously didn't show online. Anyway, after leaving out the most shocking shades of the lot, I added yarn in more subdued hues to balance it out a tad. The result wasn't so bad in the end.


Only problem: I wanted to do the back panel of the cushion in "baby" granny squares, which you can see in the picture above. For that, I would need about a hundred of them. The core of the squares is very quick and even fun to make - just one round of 12 trebles in groups of 3s with 2 chains in between. Soon, I'd made about 50 of them. But the border was in that horrible, scratchy, squeaky white yarn, two double crochets rounds of it. I made about ten and then couldn't face it anymore. So I stopped.


But there was another reason I was losing interest. That reason is pictured at the top of this page. A big pile of brand new yarn that had just arrived in the post. I knew exactly what I was going to do with it. Inspired by Lucy from Attic24, and especially by this post on her blog, I'd decided to take the plunge and to order yarn to make... a Blanket. Now, I normally don't order yarn online without having seen and felt it first, but Lucy's post about Stylecraft Special DK gave me a bit more confidence and I chose 12 shades which I thought would roughly complement the colours of the Rug - since both would be in the bedroom.

The yarn arrived two days later. I had been excited about it already from the minute I confirmed the order, but actually receiving it sent me in a bit of a feverish state. I laid it out on my couch and drank in all those beautiful colours. Some were slightly different than what I'd expected when ordering online, but I was disappointed with none of them. I was super excited, and literally ITCHING to get started.

As this was a weekday, I was working. But I usually work from home, sitting at the dining room table. And I found it very hard to concentrate, my attention being drawn as it was by the wondrous pile peeking cheekily at me from around the cushions and over the sleeping Cat. The yarn seemed to be telling me: "Come on, why are you working? You've got more important things to do... like a Blanket!"


I managed to resist temptation long enough to finish my work, before I finally allowed myself to grab a hook and make a start. Only that I didn't know exactly how to start. I wanted to make a granny square blanket, I knew as much. But what kind of granny squares?

Should I go classic? I really loved the look of this blanket by Tehri:


Another variant of the classic granny square is the giant granny square, where your blanket is effectively one single, huge granny square, like this beauty by Jacquie from Bunny Mummy:


Or should I go solid granny squares? I seem to have a natural preference for them, as shown in my granny square post. And they make wonderful blankets, as well. Here's a gorgeous example by Dawn Sparks on her blog:


Another option, which I'd never explored: the sunburst granny square. A different technique for a very different feel. Here's a great blanket result by Siriiz


I decided that I would make samples for each granny square (bar the giant one) to get a feel of the yarn and colour use. Since I'd never made a sunburst granny square, I started to look for tutorials online and in crochet books. Here's an excellent tutorial by Eda from her blog. I ended up making up my own pattern using a combination of different ones. And soon, I had this:


I would be lying if I said it took me eight squares to know that I was not going to bother making classic and solid granny square samples. From number one - top right-hand corner in the pic above - I knew my blanket would be of the sunburst granny square kind.

From then on, there was no stopping me, and I hooked and hooked away. By the next day, I'd progressed to this:


I absolutely love them, and will in fact get on with more as soon as I've put the final stop to this post. I find it pure delight to choose the colour combinations and to watch the circles change with every new round. And the fact they're so reminiscent of miniature suns puts a constant smile on my face, especially in this grey, rainy, wintry weather. I simply cannot wait to make more!

What do you think? Do you like them? How would you make your own blanket?

04 February 2014

Granny Squares Galore


I love granny squares. I can't get enough of them and have been making way more than I actually need. I usually make them for the pleasure of making of them, often without knowing what I'll end up doing with them, if anything.

And yet, it was far from love at first sight. My earliest memory of granny squares was a crochet blanket on my grandparents' sofa. It was a garish affair that I never really liked. Years later, when I rediscovered crochet, I dismissed granny squares as old-fashioned, and stayed clear of them. To me, they were tacky and reminiscent of the-not-so-best-of 70s fashion, like these:


*Gasps* Mind you, I think Paul McCartney rocks them way better, but hey, I'm a Beatles fan, so I may be biased:


Anyway, the truth is, I think I felt intimated by the apparent complexity of their structure - they are, in fact, deceptively simple, but obviously you wouldn't know that until you'd learnt to make one. In those early days, I tried my hand at a classic granny square detailed in a crochet learning book. Don't ask me how but I ended up with 5 corners. The reason is actually simple: I did two sets of three trebles in the middle section (top in the photo), and in granny square maths, 2 sets of three trebles = 1 corner. But I didn't realise that then, and therefore couldn't see where I'd gone wrong.


Oh dear. That was it, I was done with granny squares. Or so I thought.

But then, my crochet addiction properly started. I went and bought yarn for no reason, spent hours browsing the Internet for crochet creations and easy-to-follow patterns. And one day, I bought a wonderful book: "The New Encyclopedia of Crochet Techniques", by Jan Eaton. I think it made me realise the incredible versatility of crochet. If you'll pardon the cheap pun, I was hooked for good.

In that book there was a section about square motifs, one of which was the simple granny square. It seemed to be winking at me every time I fell on its page, as if saying: "You know you want to." Just at that time, I had purchased a thick variegated yarn which I didn't really know what to do with. Its fate was thus sealed.

Soon, a four-corner structure started flying off my hook, in a rainbow of gradually changing colors. It was pure joy to watch it grow, with its many colours shimmering in the light. I took it with me on holiday, safely tucked in my recently completed summer tote, ready to be taken out as soon as I had a moment to myself.


After that, there was no way back. I became a granny square junkie.

I started making more granny squares...


...and more granny squares...


...and more granny squares...


...er, and more granny squares...


...yep, and more granny squares...


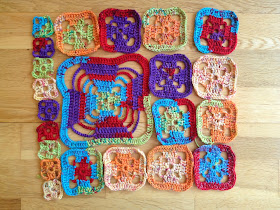
In fact, I am currently working on a granny square project (there's a surprise)... Here's a little sneak peak:


Can you guess what it is (as in, apart from granny squares)? I won't tell you more, as I'm sure I'll very soon dedicate a whole post about it :)

I have also two other granny square WIPs, which are in no fit condition at the moment to be photographed. I have also just received in the post a small mountain of yarn that will definitely involve some (heavy) granny square work.

And given the incredible variety of granny squares (plus the fact that you can always create your own if you do get tired of them!), it looks like I'm not going to get bored soon. Here's the tiniest selection, a montage by aidaha from this blog post:


Looks like I've got my work cut out, doesn't it? But one word of reassurance... Don't go thinking granny squares is all I ever make. 

I make... circles, too!


More on this soon, definitely. ;)